어플을 만들때 이미지 뷰의 모서리를 둥글게 만들고 싶을 때가 있다. 그게 훨씬 더 예쁘니까~~
내가 아는 방법은 3가지 정도가 있는데 2가지는 실제로 적용을 해 봤다.
1. radius.xml 파일
첫번째로 radius.xml파일을 만든 뒤에 kotlin 파일에서 코드로 적용시켜주는 방법이다.
//1. radius xml파일을 만든다.

<shape xmlns:android="http://schemas.android.com/apk/res/android"
	android:shape="rectangle">
	<corners android:radius="8dp"/>
 </shape>

 //2.ImageView에 적용해준다.

 GradientDrawable drawable= (GradientDrawable) context.getDrawable(R.drawable.radius);
 imageView.setBackground(drawable);
 imageView.setClipToOutline(true);
위 방법은 구글링하면 쉽게 찾아볼 수 있기도 하고, 사실 내가 사용해보지 않은 방법이다. 그래서 자세히 설명은 못한다ㅎ. 다만 이 방법은 Image 파일이 xxx.png 이런 식으로 어플 내부에 가지고 있을 때 적용되는 방법이다. url로 이미지를 끌어와서 radius를 처리하고자 한다면 이 방법은 쓰지 못한다.
2. CardView
두 번째 방법으로는 CardView가 있다.
우선 build.gradle 파일에 아래 코드를 추가해주자.
//build.gradle(Module:app)

dependencies {
    implementation("androidx.cardview:cardview:1.0.0")
}
그리고 xml 파일에서 radius 를 주고싶은 ImageView 태그를 CardView 태그로 감싼다.
<androidx.cardview.widget.CardView
    android:id="@+id/player_album_iv"
    android:layout_width="match_parent"
    android:layout_height="wrap_content"
    app:cardCornerRadius="10dp"
    app:layout_constraintStart_toStartOf="parent"
    app:layout_constraintBottom_toTopOf="@id/player_lyrics_1_tv">

    <ImageView
        android:layout_width="match_parent"
        android:layout_height="match_parent"
        android:src="@drawable/img_album_exp2"
        android:scaleType="centerCrop"
        android:adjustViewBounds="true"/>

</androidx.cardview.widget.CardView>app:cardCornerRadius="10dp"위 코드가 핵심인데, 10dp 만큼의 radius를 주겠다는 뜻이다.
3. Glide 라이브러리
세번째로는 Glide 라이브러리이다. 개발을 하다 보면 로컬 갤러리나 서버 통신을 통해서 url을 받아서 이미지로 보여줘야 하는 경우가 생긴다.
이때 이미지 url을 이미지로 변환시켜 주는 라이브러리 중 하나가 Glide 라이브러리 이다. 많은 개발자들에게 인기있는 라이브러리라고 한다. 그래서 나도 적용시켜 보았다.
우선 build.gradle파일에 아래 코드를 추가해주자.
//build.gradle(Module:app)

dependencies {
    implementation 'com.github.bumptech.glide:glide:4.10.0'
    annotationProcessor 'com.github.bumptech.glide:compiler:4.10.0'
}
추가적으로 통신을 통해서 이미지 url를 받아와야 하는 경우에는 AndroidManifest.xml에 인터넷 사용권한을 추가해준다.
<uses-permission android:name="android.permission.INTERNET" />
우선 xml파일에 ImageView를 만들자.
<ImageView
    android:id="@+id/player_album_iv"
    android:layout_width="match_parent"
    android:layout_height="wrap_content"
    android:adjustViewBounds="true"
    android:scaleType="centerCrop"
    android:src="@drawable/img_album_exp2"
    app:layout_constraintStart_toStartOf="parent"
    app:layout_constraintBottom_toTopOf="@id/player_lyrics_1_tv"
/>
그 다음으로는 kotlin 파일에 코드르 추가 해 주어야 한다.
기본 사용법은 아래와 같다.
Glide.with(context)
     .load("이미지 url")
.into(imageView)- with() 메소드는 Context, Activity, Fragment, View를 파라미터로 받고,
- load() 메소드는 Drawable, URL, File, Bitmap 등의 이미지 정보를 가지고 있는 객체를 파라미터로 받고,
- into() 메소드는 이미지를 넣을 ImageView를 파라미터로 받는다.
한마디로 말 하면 with() 로 객체를, load() 로 이미지를 가져 온 뒤에 into()로 그 이미지를 ImageView에 넣어준다는 말이다.
이제 우리는 이 Glide 라이브러리를 활용해서 ImageView 에 radius 값을 추가해 줘야 한다.
아래에서 radius 값을 줄 수 있는 메소드 외에 대표적인 메소드 몇가지를 소개하겠다.
1) transform(RoundedCorners())
딱 보면 알 수 있듯이 radius값을 주는 메소드이다.
Glide.with(this)
    .load(R.drawable.img_album_exp2)
    .transform(RoundedCorners(80))
    .into(binding.playerAlbumIv)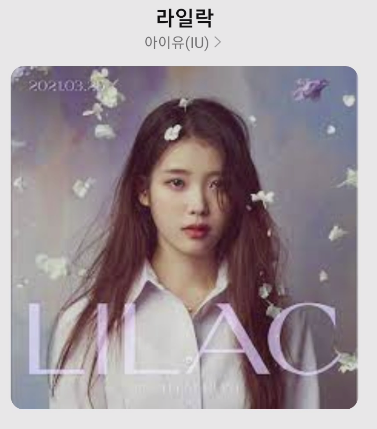
위 사진에서 보는것과 같이 모서리가 둥글어 진 것을 볼 수 있다.
2) placeholder()
이미지가 로딩되는 동안에 보일 이미지를 정하는 메소드이다. resourceId나 drawable이 들어간다.
Glide.with(this)
	.load("이미지 url")
	.placeholder(R.drawable.loading)
	.into(imageView)
3) error()
이미지 로딩에 실패했을 경우 실패 이미지를 지정해 줄 수도 있다.
Glide.with(this)
    .load("이미지 url")
    .error(R.drawable.error)
    .into(imageView)
이 외에도 여러 메소드들이 내장되어 있다. 필요에 맞게 구글링해서 사용하도록 하자.
'안드로이드 > [Kotlin]' 카테고리의 다른 글
| [Kotlin] ViewPager2 & TabLayout (Feat. FragmentStateAdatper, TabLayoutMediator) (0) | 2021.10.24 |
|---|---|
| CoordinatorLayout 적용 (Feat. Scroll 상단 고정) (0) | 2021.10.20 |
| [Kotlin] 상단의 Status Bar를 투명하게 만들어 보자. (0) | 2021.10.04 |
| [Kotlin] ListView 생성. Custom Adapter 사용하기 (0) | 2021.08.20 |
| [Kotlin] Activity 전환 & 데이터 전달 (Intent, putExtra...) (0) | 2021.08.07 |


